If you are not redirected automatically, follow the link to Willy's

Friday, July 26, 2013

Macbook Pro

I was wondering what I should model next, and I got inspired by this image:

Laptop Render - by Heui Sung Kim


So I thought I should model my MacBook!.


Modeling Macbook Pro


However, I realized to get a precise detail of MacBook was actually really difficult. However, I tried my best to get the closest looking image of my MacBook Pro.


Now, since I am done with modeling, I decided to place it in a situation.
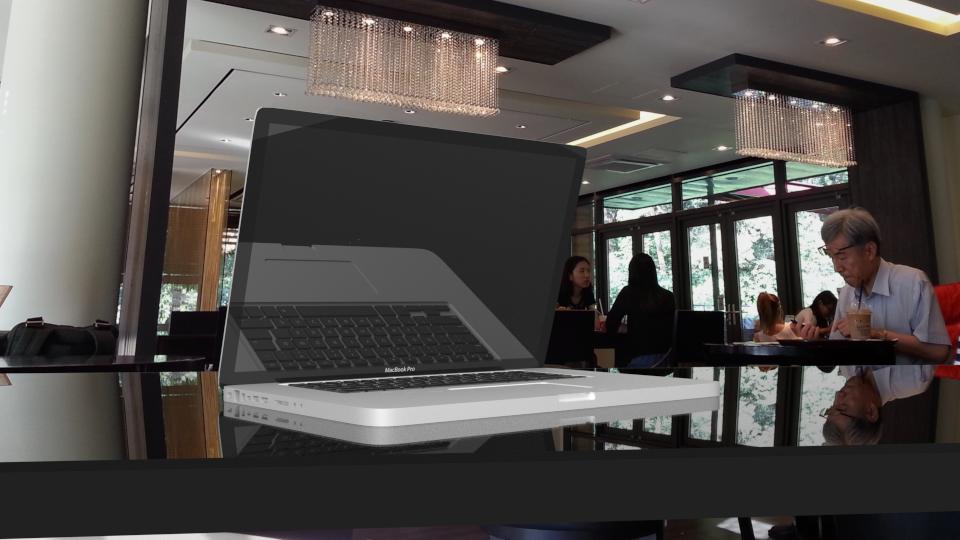
Macbook Model in Situation - Without Depth of Field
Looking Good. By the way, the scenery behind is some cafe in Seoul National University that I went while I was doing International Summer Institute in Seoul National University.

Now it's time to adjust depth of field. 

Macbook Model in Situation - Adding & Adjusting Depth of Field


I tried to find an interesting composition, but it was not easy.


After few tries, I decided the one in the bottom seemed to be a good composition.


Overall, I was satisfied with the final outcome, however I still feel somewhat unrealistic when I see this rendered image. Therefore I think I should develop more to get more realistic rendered result.

Wednesday, July 17, 2013

Books!

This is my UV Wrapping practice work/ experimental work!

UV Wrapping was always my weak point (and still is) and one of the difficult and cumbersome stuffs that I did not want to do. However, I realized if I knew how to utilize UV Wrapping well, I will be able to create some fabulous work. Therefore, I decided to practice.
Since UV Wrapping is very effective in adding textures such as images, I decided to practicing adding the cover pages of books.

3D Modeling process
Now, after rigorous UV Wrapping experiment, I came up with this:

UV Wrapping + Rendering
WOW! IT'S BOOKS!

Although my brother criticized (alot actually) about the details of the UV Wrapping (and even the modeling part) I was happy to come up with this result for my first UV Wrapping practice.

Tuesday, July 16, 2013

Rubik's cube animation 2

This is continued experiment of Rubik's cube animation from the previous animation test.


Camera movement experiment 1

Saturday, July 6, 2013

Rubik's Cube Animation

After 2 months into blender, I started get interested in animation. So I looked up few tutorials and started to learn all these stuffs about timeline, locrot etc...

And I thought making a rubik's cube was a good start for animation.


My first animation created with Blender!

Tuesday, June 11, 2013

Interior Case Study #2 (Work in Progress)

This is 3rd Interior scene practice that I started doing. In order to explain more about this work, I first have to introduce myself.
As a blender lover, an artists and a designer, I also love listening to musics and playing the musical instruments. So here, in Korea, I decided to get a tutor for my bass guitar so asked few of the people I know whether I can get a bass guitar lesson. And some people said yes. So I decided to visit the studio where the guy who is going to teach me the bass guitar, and the studio was absolutely a disaster.


Apparently, the teacher told me that he was going through series of constructions for remodeling.


At that moment, I thought: 'Ah! What if I design this interior?'

...So that's how I started working for this.


Interior Source: Narnia's Closet


This is the basic modeling of the interior with lighting. However, there seems to be too much noise.


I tried to adjust the noise, however, it seems to not go off. So I just decided to go on.


Light Adjustment

After getting the lightings right, I started to add the textures.


To be continued...

Thursday, June 6, 2013

Razor

Once apon a time I was just surfing through the web, looking at some fabulous images created with blender. And at one point, I came across a simple shaver rendered image. And I thought, 'Oh lets render this!'

So I did.

Let's Shave (Idea & Original image from RBahn (Blenderguru))


The image above shows the 3 modeling of the shaver.


The birds eye view of the shaver (with materials)

Now, using a previous knowledge of creating water droplets, I decided to create water droplets again for this experiment.


After looking at the water droplets closer, I realized the water droplets did not look as water, rather a rock or a transparent glass sculpture.


Therefore, after adjusting the transparency and materials, I was able to get a result below:


Now, I added depth of field.

Depth of Field


This work was actually good practice to practice modeling and materials + lighting. I am generally satisfied with the final result, however there is definitely room for improvements.

Monday, June 3, 2013

Rainy Window

Hey guys! It's been a long time since I did something off from a tutorial, so I decided to do something learning from tutorial this time.

Today, I decided to use blenderguru.com for my tutorial for creating a rainy window.


This is the process of creating a raindrops on the window.


After adjusting the amount and the size of the water droplets, I thought of rendering this:


...So cool

Now, it's time to add more details to the image - the mist.


And the light.

Adding Light

The image looks really great! However it seems that there need to be more adjustment for the lighting.

Configuring light


Light Adjustment

Now, using the compositing node, I decided to add some depth of field into this work.

Depth of Field
...And vignette

Vignette

The final result looks very fabulous, however I think there needs to be adjustment with the position of depth of field. Apart from that I was really satisfied with the final outcome.

Tutorial Help: www.blenderguru.com